Graphic LineDraw: Difference between revisions
No edit summary |
Gordon.dye (talk | contribs) |
||
| (20 intermediate revisions by 2 users not shown) | |||
| Line 1: | Line 1: | ||
The '''Graphic_LineDraw''' [[BRConfig.sys]] specification controls | CONFIG GRAPHIC_LINEDRAW {ON | RAISED | SUNKEN | OFF} | ||
The '''Graphic_LineDraw''' [[BRConfig.sys]] specification controls the appearance of [[borders]] around [[windows]]. | |||
====A Problem==== | |||
Older programs often used GRAPHIC_LINEDRAW and ASCII linedraw characters to create borders. However, if these programs are run in updated versions of BR with [[CONFIG GUI OFF]] and a wide screen, the characters appear as dashes instead of smooth lines. | |||
[[file:Dotted.jpg|225px]] | |||
Instead of this: (which can be re-captured by resizing the screen to the "right" size) | |||
[[file:Smooth.jpg|150px]] | |||
====The Solution==== | |||
To solve this, continue to run the program with [[CONFIG GUI OFF]], and download the following image files to solve the problem: DRAWLINE.BMP and/or DRAWSUNK.BMP from the WinUtil file of the [ftp://ftp.brulescorp.com/Dll_Distr/CURRENT/431a/winutil/ ftp site]. These files should be placed in the BR executable folder or, if running in client server mode in version 4.1 or 4.2, in the client executable folder. Version 4.3 accesses these files on the server in all configurations. | |||
Then specify GRAPHIC_LINEDRAW SUNKEN ( or RAISED ). | |||
===Overview=== | |||
The following linedraw modes are supported with GUI ON: | |||
CONFIG GRAPHIC_LINEDRAW THINRAISED (Thin line Windows mode) | CONFIG GRAPHIC_LINEDRAW THINRAISED (Thin line Windows mode) | ||
CONFIG GRAPHIC_LINEDRAW THIN (Default BR thin line sunken) | CONFIG GRAPHIC_LINEDRAW THIN (Default BR thin line sunken) | ||
The following linedraw modes are supported with GUI OFF: | |||
CONFIG GRAPHIC_LINEDRAW RAISED | |||
CONFIG GRAPHIC_LINEDRAW RAISED | |||
CONFIG GRAPHIC_LINEDRAW SUNKEN | CONFIG GRAPHIC_LINEDRAW SUNKEN | ||
RAISED is the default with GUI OFF. | |||
RAISED is the default | |||
[[image:Raised.jpg]] | [[image:Raised.jpg]] | ||
THIN or THINSUNK (with GUI ON) indents line draw characters giving a bit more conservative appearance. | |||
[[image:Sunkenline.jpg]] | [[image:Sunkenline.jpg]] | ||
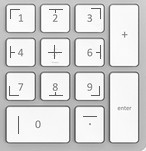
Lines are drawn on a window by using [[PRINT FIELDS]] and linedraw characters. Linedraw characters are generated via the numeric keypad using the numbers 0-9 and . when you are in linedraw mode. To toggle linedraw mode on and off, press Ctrl backslash (CTRL \). See diagram for clarification: | |||
[[image:keypad.jpg]] | [[image:keypad.jpg]] | ||
Custom linedraw sets may be used by modifying the bitmaps DRAWLINE.BMP and DRAWSUNK.BMP. | |||
This feature is supported by the [[CONFIG]] command and becomes effective upon the next [[OPEN]] of window #0. Using [[EXECUTE]] allows you to set it from within the program. | |||
It is also possible to use these commands within a Screen Paint program to design your screens. A Screen Paint program would be based on a [[Rinput Fields]] map of the screen. | |||
====Example==== | |||
Below is a sample program for printing these borders: | Below is a sample program for printing these borders: | ||
[[image:Linedraw. | [[image:Linedraw.jpg]] | ||
Remember to press CTRL\ to type in the linedraw images. | Remember to press CTRL\ to type in the linedraw images. | ||
Latest revision as of 06:10, 16 December 2016
CONFIG GRAPHIC_LINEDRAW {ON | RAISED | SUNKEN | OFF}
The Graphic_LineDraw BRConfig.sys specification controls the appearance of borders around windows.
A Problem
Older programs often used GRAPHIC_LINEDRAW and ASCII linedraw characters to create borders. However, if these programs are run in updated versions of BR with CONFIG GUI OFF and a wide screen, the characters appear as dashes instead of smooth lines.
Instead of this: (which can be re-captured by resizing the screen to the "right" size)
The Solution
To solve this, continue to run the program with CONFIG GUI OFF, and download the following image files to solve the problem: DRAWLINE.BMP and/or DRAWSUNK.BMP from the WinUtil file of the ftp site. These files should be placed in the BR executable folder or, if running in client server mode in version 4.1 or 4.2, in the client executable folder. Version 4.3 accesses these files on the server in all configurations.
Then specify GRAPHIC_LINEDRAW SUNKEN ( or RAISED ).
Overview
The following linedraw modes are supported with GUI ON:
CONFIG GRAPHIC_LINEDRAW THINRAISED  (Thin line Windows mode)
CONFIG GRAPHIC_LINEDRAW THIN        (Default BR thin line sunken)
The following linedraw modes are supported with GUI OFF:
CONFIG GRAPHIC_LINEDRAW RAISED
CONFIG GRAPHIC_LINEDRAW SUNKEN
RAISED is the default with GUI OFF.
THIN or THINSUNK (with GUI ON) indents line draw characters giving a bit more conservative appearance.
Lines are drawn on a window by using PRINT FIELDS and linedraw characters. Linedraw characters are generated via the numeric keypad using the numbers 0-9 and . when you are in linedraw mode. To toggle linedraw mode on and off, press Ctrl backslash (CTRL \). See diagram for clarification:
Custom linedraw sets may be used by modifying the bitmaps DRAWLINE.BMP and DRAWSUNK.BMP.
This feature is supported by the CONFIG command and becomes effective upon the next OPEN of window #0. Using EXECUTE allows you to set it from within the program.
It is also possible to use these commands within a Screen Paint program to design your screens. A Screen Paint program would be based on a Rinput Fields map of the screen.
Example
Below is a sample program for printing these borders:
Remember to press CTRL\ to type in the linedraw images.


